I heard there was a ToB mod for those two. Is that true? I haven't been able to find it, and I heard Viconia's normal ending is pretty sad. I'd like to avoid that.
↧
Anomen/Viconia romance mod?
↧
HELP - BG:EE Dark Horizons mod
Hy Guys,
I'm stucked in the game due to the fact that Davenport dosen't spawn as usual in AR2800.
Already killed Najara and actually I'm in chapter 5.
Can I solve this issie with CLAUconsole? Which is the creature string ?
Thanks!
I'm stucked in the game due to the fact that Davenport dosen't spawn as usual in AR2800.
Already killed Najara and actually I'm in chapter 5.
Can I solve this issie with CLAUconsole? Which is the creature string ?
Thanks!
↧
↧
New landscape environment art for Infinity Engine games with Blender
I've always loved the beautyful environments and landscapes of the Infinity Engine games, especially the outdoor areas of BG1 and IWD.
I also was disappointed that most of the mods only reused old areas or recombined at most.
So I started 6 week ago to find out how to create my own areas and with the right tools it is actually not that hard.
I looked into 3DS max, but was not happy with it. So I stumbled across Blender and gives you almost everything you need to create your own areas from scratch.
Here is what I've achieved so far.
Two month ago I had never dreamt of being an environment artist and I have done a pretty good job for the start, I guess.
The best thing about Blender is that ist is free and that you a lot of built-in plug-ins to shape the landscape you have ever dreamt of.
![image]()
For creating the landscape itself you use the ANTLandscape plug-in.
For trees you use the Sapling Tree Generator.
For walls and castles there is a Masonry plug-in.
For placing all of the stones and plants you can use the built-in Particle System (also useful for creating animations, both character and spell)
For grass use the Hair Simulation.
To destroy, build or deform things use the Modifiers.
Assets like buildings, trees, plants, items can be found everywhere on the net for free (you can use .3ds, .obj), so you don't have to build it from scratch.
All of the shading is done by Blender itself. You only have to experiment with the properies of environment lighting, ambients,...
You can find thousands of free hi-res textures by using the Google image search.
How to start:
Download Blender and Gimp (for edit textures). Crazybump is also very useful the create normal , displacement and specular maps in 5 minutes.
Find some nice tutorials on Youtube. There are hundred of good ones for every aspect of the application. First focus on general usability and landscape creation / texturing.
Create your first landscape with the ANTLandscape plug-in.
Set your camera to isometric view (Orthographic camera 45° view). zoom that it fits your landscape.
Add some textures to it (grass, cliffs,...) For blending texures on you landscape use stenciling.
Create a normal map of your texture to get more 3d feeling.
Add some cloud textures to your landscape to create an irregular surface.
Add a sun (raytraced shadows). and Sky
Set the render properties (resolution 5120x3840, anti-alias)
Set the world properties (add some enviroment lightning, ambient occlusion)
Render you scene (Took me 10 hours to render the attached area, but you can switch off shadows, anti-alias, enviroment lightning, ambient occlusion to reduce the test renders to 5-10 min, also reduce resolution).
Later:
Add some water (make your material transparent, shiny and reflecting. add some fresnes effect)
Download some trees, plants, buildings items like barrels, carts,... and place it in your scene.
Try the modifiers to create and modify models (very useful is Mirror, Array, Build and Solidify modifier).
Use the particle system to randomly, yet controllable spread your plants and rocks over the surface.
Build your own models, rearrange others, texture them like you want them.
Use groups, layers to manage your scene.
What you can also do:
Create your own animations. Create or download a character. Animate it. (I haven't done this, it certainly is much more difficult)
Create particle effects like spell animations (should be easy with the particle system)
Be creative, use your imagination and have fun.
I can send you some blend files to show you which preferences I used.
Links:
http://www.blender.org/
http://www.gimp.org/
http://www.crazybump.com/
I also was disappointed that most of the mods only reused old areas or recombined at most.
So I started 6 week ago to find out how to create my own areas and with the right tools it is actually not that hard.
I looked into 3DS max, but was not happy with it. So I stumbled across Blender and gives you almost everything you need to create your own areas from scratch.
Here is what I've achieved so far.
Two month ago I had never dreamt of being an environment artist and I have done a pretty good job for the start, I guess.
The best thing about Blender is that ist is free and that you a lot of built-in plug-ins to shape the landscape you have ever dreamt of.

For creating the landscape itself you use the ANTLandscape plug-in.
For trees you use the Sapling Tree Generator.
For walls and castles there is a Masonry plug-in.
For placing all of the stones and plants you can use the built-in Particle System (also useful for creating animations, both character and spell)
For grass use the Hair Simulation.
To destroy, build or deform things use the Modifiers.
Assets like buildings, trees, plants, items can be found everywhere on the net for free (you can use .3ds, .obj), so you don't have to build it from scratch.
All of the shading is done by Blender itself. You only have to experiment with the properies of environment lighting, ambients,...
You can find thousands of free hi-res textures by using the Google image search.
How to start:
Download Blender and Gimp (for edit textures). Crazybump is also very useful the create normal , displacement and specular maps in 5 minutes.
Find some nice tutorials on Youtube. There are hundred of good ones for every aspect of the application. First focus on general usability and landscape creation / texturing.
Create your first landscape with the ANTLandscape plug-in.
Set your camera to isometric view (Orthographic camera 45° view). zoom that it fits your landscape.
Add some textures to it (grass, cliffs,...) For blending texures on you landscape use stenciling.
Create a normal map of your texture to get more 3d feeling.
Add some cloud textures to your landscape to create an irregular surface.
Add a sun (raytraced shadows). and Sky
Set the render properties (resolution 5120x3840, anti-alias)
Set the world properties (add some enviroment lightning, ambient occlusion)
Render you scene (Took me 10 hours to render the attached area, but you can switch off shadows, anti-alias, enviroment lightning, ambient occlusion to reduce the test renders to 5-10 min, also reduce resolution).
Later:
Add some water (make your material transparent, shiny and reflecting. add some fresnes effect)
Download some trees, plants, buildings items like barrels, carts,... and place it in your scene.
Try the modifiers to create and modify models (very useful is Mirror, Array, Build and Solidify modifier).
Use the particle system to randomly, yet controllable spread your plants and rocks over the surface.
Build your own models, rearrange others, texture them like you want them.
Use groups, layers to manage your scene.
What you can also do:
Create your own animations. Create or download a character. Animate it. (I haven't done this, it certainly is much more difficult)
Create particle effects like spell animations (should be easy with the particle system)
Be creative, use your imagination and have fun.
I can send you some blend files to show you which preferences I used.
Links:
http://www.blender.org/
http://www.gimp.org/
http://www.crazybump.com/
↧
[URGENT PLEASE READ] Small mods: Level cap to 2,950,000, max hp during level up, etc...
Hi,
I'm pretty new to BGEE but I modded the game a bit, nothing too much.
File: lh73_override2.zip
Link: https://docs.google.com/open?id=0B4xflxrrgSrwMXdtWTdGR3paVFE
Installation:
Please install the files you want to the override folder under Data\00766.
1. Level cap to 2,950k (Monk to 2,675k, max level 19 due to early activation of Abilities button)
Raises level cap to 2,950k for the main game and the black pit. Didn't want to break the character files that I'm going to import to the upcoming BG2EE, i.e. mess up with high level abilities etc. Call me chicken if you want...
I have browsed through the 2DA files and noted that most classes had their corresponding abilities embedded up to level 40.
But some classes, such as Druid and Archer, didn't have proper class abilities beyond certain levels (level 14 for Druid and level 21 for Archer), and Wizard Slayer did not develop +5% magic resistance every even levels after level 19.
Which kinda makes sense since level cap was raised only at TOB, and it looks like BGEE used mainly BG2 data.
Sorcerers will be able to use up to level 8 spells no problem, but Wizards are at disdvantage because there is no level 6 to 8 scrolls in the game (there is no scroll item files either, so someone may have to mod BGEE to import them from BG2 or use Shadowkeeper; but the good new is, once the spells are in the spell book then the mage character should be compatible with BG2EE) so cannot memorize them.
It looks like that unless BGEE is modded somewhat extensively, currently it is safer to use the level cap of 2,950,000 (BG2 level cap), than level cap remover, should you wish to develop the character that you want to import to BG2EE.
Files to install:
STARTARE.2DA
STARTBP.2DA
XPCAP.2DA
2. Max HP roll for level up
Max HP roll during level up. Couldn't modify Barbarian class.
Files to install:
HPMONK.2DA
HPPRS.2DA
HPROG.2DA
HPWAR.2DA
HPWIZ.2DA
3. Druid Shapeshifter fix
At level 13, Shapeshifter was supposed to get an additional use of "Shapeshift to Werewolf" but it was somehow skipped due to the ability "Shapeshift to Greater Werewolf". This file adds the missing daily use of the shapeshift ability at level 13.
File to install:
CLABDR03.2DA
4. Roll minimum of 15 during character creation
You cannot roll less than 15.
File to install
ABCLASRQ.2DA
Thanks for reading and please feel free to use or modify them in whichever way you see fit :-)
↧
editing pre-existing cities using dltcep/ near infinity in bg2ee
i want to edit in a new door or so in a pre existing city , preferably in tob, without have to save as a new large area...
or else adding in a new actor in a city.. simple stuff i assume.. for example will it bug up if i loaded in a city and overrited over the file or is it preferable to save as somthing elsse, and will it work.
so editing a pre existing city with a new door to a home made house, adding an actor to a previsouly existing city
i want to be able to eventually create a large massive dungeon, somthing to toy around with...
↧
↧
Player how-to: Getting mods to work on BGEE
When it launches next week No older mods will currently work on BGEE because the current version of WeiDU (the tool used by mods to install) won't be able to understand the BGEE setup. There are, fortunately, workarounds that will allow WeiDU to work on the BGEE setup while we await a new version of WeiDU.
Please note that mods may have issues with the content of BGEE itself; these steps just get you to the point where you can at least try to install them. There will be a transition period where a lot of modders have to make minor adjustments to account for BGEE content--I strongly suggest you take advantage of the contact information in the readmes to let authors know about any issues you find so that they can address them.
Note: When I refer to the 'game folder' or 'game directory', it means the folder that contains chitin.key.
Step Two
WeiDU has a problem reading one of the files that contains game resources, so we have to manually extract them as a workaround. Download the latest jar of Near Infinity (NI), which should work on OS X and Windows. (If it doesn't open when you double-click it, you may need to download the Java Runtime Environment for your OS as well.) The first time you open it will ask for your key file; navigate to your BGEE directory and select chitin.key. (If it doesn't prompt, you can select your BGEE game by selecting Game > Open game in the menu.)
Once BGEE is loaded in Near Infinity, go to Edit > BIFF; select Data/Tutorial.bif under 'edit existing'. Select all the files on the left, hit the right-facing arrow in the middle, and press the save button. It should give you a small window showing six steps completed and an OK button. Hit OK and then close NI.
Tutorial.bif should no longer be a problem, so step two can be skipped.
ALIEN has an alternative method for Windows XP users a few posts down.
Please note that mods may have issues with the content of BGEE itself; these steps just get you to the point where you can at least try to install them. There will be a transition period where a lot of modders have to make minor adjustments to account for BGEE content--I strongly suggest you take advantage of the contact information in the readmes to let authors know about any issues you find so that they can address them.
Note: When I refer to the 'game folder' or 'game directory', it means the folder that contains chitin.key.
Step One
Go to your game directory and make backups of chitin.key and the Tutorial.bif file in the Data directory. Double check that an 'override' folder exists and create one if it doesn't.Step Two
WeiDU has a problem reading one of the files that contains game resources, so we have to manually extract them as a workaround. Download the latest jar of Near Infinity (NI), which should work on OS X and Windows. (If it doesn't open when you double-click it, you may need to download the Java Runtime Environment for your OS as well.) The first time you open it will ask for your key file; navigate to your BGEE directory and select chitin.key. (If it doesn't prompt, you can select your BGEE game by selecting Game > Open game in the menu.)
Once BGEE is loaded in Near Infinity, go to Edit > BIFF; select Data/Tutorial.bif under 'edit existing'. Select all the files on the left, hit the right-facing arrow in the middle, and press the save button. It should give you a small window showing six steps completed and an OK button. Hit OK and then close NI.
Tutorial.bif should no longer be a problem, so step two can be skipped.
Step Three
WeiDU expects the tlk file (which holds all the text in the game) to be in the main game directory, but BGEE puts it in subdirectories to allow for multiple languages. We can create a hard link, tricking WeiDU into thinking it's in the main game directory while leaving it where it is. First, figure out which language subdirectory inside the lang folder is yours. English is the en_US directory inside lang; other languages have their own directories inside the lang folder.In Windows...
...open a command window and navigate to your game directory. (In Windows 7, you can shift-right-click on the game folder in Explorer and choose 'Open command window here...'. In older Windows, you'll need to Windows+R for the run dialogue, run cmd, and then use 'CD nameofdirectory' to get to the game directory.) Once you're at the command prompt in your main directory, typemklink /H dialog.tlk .\lang\en_US\dialog.tlkChange the en_US part to the name of your language directory. Some languages actually have two tlk files, so you'll need to run the same command again, but with dialogF.tlk in both places instead of dialog.tlk. If you ever want to undo this step, you can delete dialog.tlk (and dialogF.tlk) from the game directory as if they're normal files.
ALIEN has an alternative method for Windows XP users a few posts down.
In OS X...
...open Terminal and navigate to your game directory. At the terminal prompt typeln -s ./lang/en_US/dialog.tlk dialog.tlkChange the en_US part to the name of your language directory. Some languages actually have two tlk files, so you'll need to run the same command again, but with dialogF.tlk in both places instead of dialog.tlk.
Go Forth and Install Mods!
You're now ready to try mods on BGEE! Again, this will just get you to the point where WeiDU will work. Individual mods may still have issues and I urge to contact the authors if you encounter any so they can get fixes in.↧
baldur.ini editing?
I haven't had any luck finding a full list for the baldur.ini files for the EE versions and what they do. Can anyone point me in the right direction? Thank you.
↧
Sword Coast Stratagems is now available for BG:EE and BGII:EE
The newest version of my mod "Sword Coast Stratagems", version 25, is now out and ought to be a bit improvement on previous versions for BG:EE in terms of stability and ease of install. It should be compatible with version 1.2 of BG:EE and (with any luck) with BG2:EE when it comes out later this week. The new version fixes a host of bugs large and small (though mostly not with BG:EE, as it happens) and (with some trepidation) I'm declaring it non-beta, though realistically it's still beta for BG2:EE.
You can download it from http://www.gibberlings3.net/scs
Edit: after two fast updates in response to problems identified with BG2:EE installs, we're now on v27. I've had to disable the "Improved Vampires" component on BG2:EE installs for the moment: some kind of animation bug is causing crashes and I don't immediately have time to sort it out. (If you have installed that component, I recommend uninstalling it.)
Edit: version 28 now out. This one fixes several severe bugs.
↧
[mod] giving NPCs classkits [tool version: alpha 6 | MOD version: 1.7]
hey guys i want to give some of the NPCs in the game a classkits, but im not familiar with all of the NPCs. So are there any suggestions/wishes?
just to say that, for the moment i will not give them a kit which comes throught an other mod (it would be to difficult to check if a spezial mod is installed or not)
So it would be great if you all can seperate this wishes from the regular one
update:
-the version "alpha 6" of the tool is out
-the version 1.7 of the mods is out
- all mods come at level 1 whith different xp
- all NPCs have a 0 xp mod
- all NPCs have a Default Class mod (NPC at default class on Level 1 whith differnt xp)
------------------------------------------------------
- Notes for using
---------------------
for your own safety, save the game before you enter the area where the joinable NPC is waiting (a house is a sepperate area)
if you found an NPC, please make a short check of Level/HP/Spells and skills
the "meet NPC whith 0 Exp" mod will also work if "NO MODDING" is selected
If you found a failure in the mods itself, please tell me which mod is installed, which Level the NPC has and where the failure is.
The tool itself isnt finished yet:
-Mac support will be added
-fast NPC mod creation function will be added
-the beta version of the tool, will make the NPCs Mods compatible with other Mods
------------------------------------------------------
- Current available mods:
-----------------------
Ajantis(Paladin):
->Paladin: Cavalier
->Paladin: Inquisitor
Alora(thief):
->thief: Swashbuckler
->thief: bounty hunter
Coran(fighter/thief):
->thief: bounty hunter
Dynahir(Mage: Invoker):
->Sourcerer
->Sourcerer: Dragon Discipline
Eldoth(bard):
->bard: blade
->bard: Skald
Faldorn(druid):
->druid: Avanger
->druid: Totemic Druid
Garrick(bard):
->bard: jester
Imoen(Thief)->all thief classcits
Kagain(fighter):
->fighter: bererker
->fighter: wizard slayer
->fighter: Dwarfen Defender
Khalid(fighter):
->fighter/Mage
->fighter: wizzard slayer
Kivan(Ranger):
->Ranger: Archer
Minsc(Ranger):
->ranger: beastmaster
->fighter: berserker
->Barbarian
Montaron(fighter/thief):
->thief: assassin
->fighter/thief: assassin
Neera(Mage: Wild Mage)
->Sourcerer
->Sourcerer: Dragon Discipline
Rasaad(Monk):
->Monk: Sun Soul Monk
Skie(thief):
->Thief: Swashbuckler
Safana(thief):
->thief: bounty hunter
->thief: Assassin
Shar-Teel(fighter):
->fighter: kensai
->fighter: Wizard Slayer
->fighter: berserker
Viconia(Cleric):
->Multiclass: Fighter/Cleric
↧
↧
troubleshooting watchers keep
i was messinga round with the wmp in dltcep and near infinity and now i am barred from watchers keep, the game crashes...checked the fiel integrity in steam and still doesnt work.. any ideas??? i dont know for sure how i screwed it up...
was trying to add new areas for the worldmap.. tob is where it screwed up
thanks
was trying to add new areas for the worldmap.. tob is where it screwed up
thanks
↧
DLTCEP AREA MAKING - HOW TO MAKE IT BRIGHT INDOORS
OK IM SLOWLY MAKNIG AREAS THROUGH DLTCEP, sorry bout the caps, how do i lighten up the indoors rooms, they are pretty dark. any ideads and thanks
↧
dltcep adding actors that arenot invisible
going thruogh the tutorial of dltcep and i have added actors but i cannot get them to apear.. what should i do?
↧
Coloured Spell & Ability Icons
I'm interested in re-colouring the spells and abilities of both BG1 and BG2 to give the game a fresher feel. I can extract and rework the icons, but I have no idea how to re-pack or compile them. I've included a few of the ones I've worked on already, nothing fantastic, just the addition of colour. If anyone can offer more information about re-packing icons or would volunteer to do such, or if it can even be done, let me know and perhaps I can work something out.
↧
↧
BP- Ascension: order of installation with other mods
Where in this order of installation would BP- Ascension go?
http://forum.baldursgate.com/discussion/23726/bgii-ee-compatible-mod-list/p1
To be more specific I want to install the following mods:
Banter packs
IEP Extended Banters
Yoshimo Friendship
Imoen Friendship
Npc Flirt packs
Romantic Encounters
Dungeon-be-Gone
I'm guessing that BP- Ascension would be the very first thing that needs to be installed?
↧
[Mod] Spontaneous Casting For Clerics and Druids
As the title says, this mod adds spontaneous casting for clerics and druids, which is based on the idea of 3e spontaneous casting ability. Some time ago, I made a half-baked version and posted it on this forum, but this is finally a finished WeiDU version. It works with both BG:EE and BG2:EE.
Spontaneous casting contains three innate abilities, that upon activating, transform all memorized divine spells of the caster to healing, harming or summoning spells of their respective levels. Good clerics receive spontaneous healing, evil clerics spontaneous harming, and neutral clerics both. Druids receive spontaneous summoning. This last for 6 hours or until the chosen divine spell is cast, then all spells are transformed back.
For this to work properly I had to add some new low-level spells. They are:
First level: Cause Light Wounds, Lesser Animal Summoning I
Second level: Cause Moderate Wounds, Cure Moderate Wounds, Lesser Animal Summoning II
Third level: Cause Medium Wounds, Lesser Animal Summoning III
Healing and harming spells are added to priests and summoning spells to druids repertoire as normal spells, that they can use.
When memorized spells are transformed, they change their icon into the respective spontaneous spells, but names of those spells remain. You can use tooltip to determine which spell are you going to cast spontaneously.
Spontaneous spells are:
1. level: Cause Light Wounds, Cure Light Wounds, Lesser Animal Summoning I
2. level: Cause Moderate Wounds, Cure Moderate Wounds, Lesser Animal Summoning II
3. level: Cause Medium Wounds, Cure Medium Wounds, Lesser Animal Summoning III
4. level: Cause Serious Wounds, Cure Serious Wounds, Animal Summoning I
5. level: Cause Critical Wounds, Cure Critical Wounds, Animal Summoning II
6. level: Harm, Heal, Animal Summoning III
7. level: Finger of Death, Resurrection, Conjure Earth Elemental
Note: Spontaneous spells can be cast immediately after spontaneous casting is activated. There is no pause between them, such as there usually is between spells. However, in the first round after activation, you can only cast divine spells, wizard spells (for cleric/mages) and innate abilities are disabled in that round. Also, because of this, when activated spontaneous casting will end Improved Alacrity spell cast by cleric/mage, as they both use the same mechanics.
Installation:
Extract the rar file below into the game's core folder (the one with a file "chitin.key" in it) and run "setup-spontaneous_casting.exe". You need to start a new game for your divine caster to receive spontaneous casting ability. Alternatively you can point a cursor over the caster and enter console command "C:AddSpell("spheal")" or "C:AddSpell("spharm")" or "C:AddSpell("spsumm")".
↧
cosmetic bug?
After Melicamp gets reverted to his human form, he'll still speak the chicken language when you click on him. Is this supposed to happen?
↧
help buldur.ini
Can't find buldur.ini file anywhere searched through all files in my bgee file and could not find it. Just got a new computer and I don't understand why I can't locate it. On my old computer I found it just fine.
↧
↧
Modding
Hithere! Im sorry for posting this in the wrong category, but I couldnt find the proper one, so I took the one "closest" to what I was looking for. This is not a bug-thingie.
I am interrested in modding in BG1-EE. More specific, Id like to try to change Yeslick's name. I cant stand the guy named Yes-lick -.-' But Im very interrested in exploring the modding possibilities. Any tips?
/Em
I am interrested in modding in BG1-EE. More specific, Id like to try to change Yeslick's name. I cant stand the guy named Yes-lick -.-' But Im very interrested in exploring the modding possibilities. Any tips?
/Em
↧
[MOD] "T'was a Slow Boat from Kara-Tur" Quest/Store/New Items - Release .90
http://www14.zippyshare.com/v/47479850/file.html
This is my first Mod that contains dialog files, a store, and a quest. The battle is pretty rough, and I would suggest a party of 6 level 5 or better ... depending on your ability. The quest starts at the Friendly Arm Inn (just to the left after entering the drawbridge). There will be 3 monks, the one in red has a story to tell you. If you take his quest and then complete it; when you return he will give you a unique leveling relic (with a future quest tied to it). Once completing the quest he will also open up a Store from Kara-Tur. I couldn't figure out 2 pieces of the Dialog, so I will list them now; < CHARNAME > is supposed to list your character name (it did not work for me). The second being creating/updating/deleting Journal Entries, so I gave you items instead that have reminders of what you are to be doing ... they serve as well as tips to the huge easter egg the quest itself is. If you enjoy playing a Monk there are some very nice items to help you through your early life (don't forget your Wisdom).
The store has a mix of about 30+ new items (around 7 or so new types). The relic is something you'll have to figure out how to work, but it has 4 levels of power. All in all it shouldn't be too over the top, the highest items in the store are +2 and there are only 3 if I remember correctly.
It may need some fixes, but I have run through it about 10 times and it seems to function ok for me. If you run across an issue please let me know, and I would be glad to correct it.
If you really have to know what is in the store, or what powers the relic will give, send me a PM.
I hope it is enjoyable!
** Two quick pix. 1. This is your quest giver. 2. .... the lights go out. What's that spinning around the head of the Avatar?
↧
Here's how to use custom portraits
Well, I guess the thread title is self-explanatory. This is an updated and expanded version of the original post, which I hope will be lot more helpful.
Many many thanks to everyone who contributed to this thread with further advice and/or questions.
1. PORTRAIT FILES
1.1 Image file format
Portraits for BG:EE are 24-bit bitmaps (.BMP). You can save images in this format using practically any image editor such as MSPaint, Adobe Photoshop or GIMP. (Check Item 6 for more info on how to properly convert your image)
1.2 Image file dimensions
UPDATE: you can now use a single large portrait, which will be resized to fit the other screens. The optimal size is 210x330 pixels. Keep it at a minimum of 169x266, to prevent blurred images.
Images can be larger than that, but no wider than 1024 pixels. Also try to keep it proportional to the dimensions that have just been mentioned, otherwise, the image will be "squeezed" and may look distorted. (Check Item 6 for more info on how to properly crop your image)
The deprecated directions are still valid and are useful if you'd like your character to have different images for each screen (or, in IWD style, different crops):
[spoiler]To use a custom portrait, you need 3 versions of an image (only 2 are required, though) with different dimensions (width x height, in pixels):
Large - 210x300 (not required - character creation screen)
Medium - 169x266 (for the character record screen)
Small - 54x84 (for the right sidebar of the game screen)[/spoiler]
1.3 Image file naming conventions
You can name your portraits however you want, as long as you follow these rules:
· NO spaces.
· Between 1 and 7 characters (not counting the size letter, see below)
· End with the letter L, M or S, according to size.
e.g.: mulderL.bmp (large), scullyM.bmp (medium), krycekS.bmp (small).
2. THE "PORTRAITS" FOLDER
In order for your portraits to show up in BG:EE, you must place them in an specific folder, named "Portraits" (without quotes). This folder is not created when the game is installed, so you must create it yourself.
2.1 Where to create your "Portraits" folder
On Windows: go to your User(s) folder. You know, the one that has My Music, My Pictures, and so on. Now follow this path: My Documents > Baldur's Gate - Enhanced Edition. That's where you must create your Portraits folder.
3. USING CUSTOM PORTRAITS
Once you have the right files on the right folder, all you have to do is select the portrait inside the game.
3.1 On a new character
When creating a new character, once you're prompted to select his or her portrait, you will notice a button labeled "CUSTOM" now shows up on the screen.
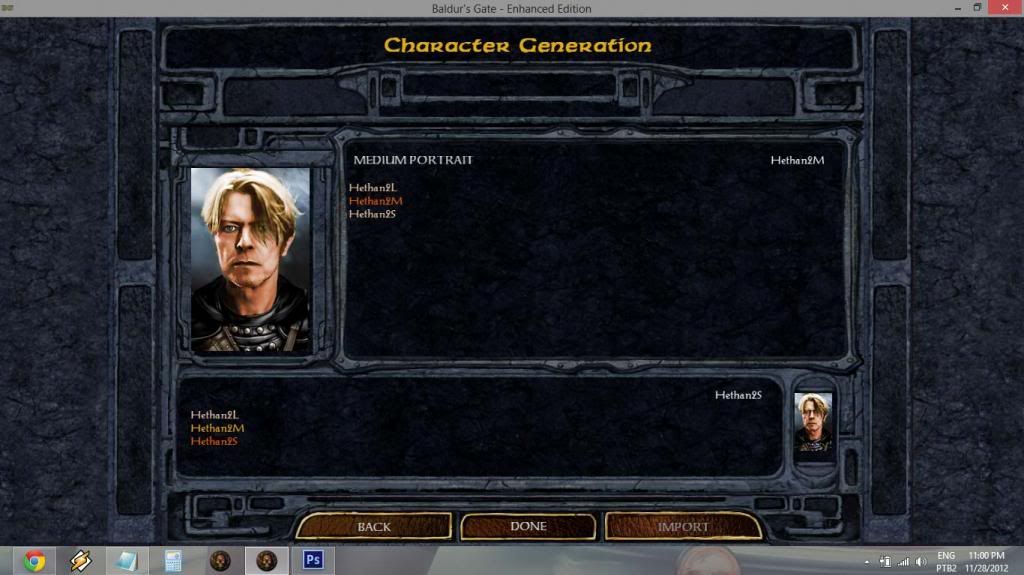
This button will take you to the screen shown below, where you'll be able to select the Medium and Small portraits. They're not required to match - you can use different M and S portraits for one character if you so desire.
(hit the spoiler button to see image)
[spoiler]![image]() [/spoiler]
[/spoiler]
The Large portrait will be selected automatically according to the Medium one, or ignored (if there is no L version).
3.2 On a previously created character
If you're already playing a character and want to change it's portrait, go to his/her Record screen and hit the button labeled "CUSTOMIZE", then "APPEARANCE".
Once you're prompted to select his or her portrait, you will notice a button labeled "CUSTOM" now shows up on the screen.
This button will take you to the screen shown below, where you'll be able to select the Medium and Small portraits. They're not required to match - you can use different M and S portraits for one character if you so desire.
The Large portrait will be selected automatically according to the Medium one, or ignored (if there is no L version).
3.3 On an exported character
Changing the portrait of an exported character is just a little trickier. There are two ways you can do so:
3.3.1 Via importing/re-exporting
Import your character into a new game (or into a loaded multiplayer game), and then follow the steps on 3.2. After doing so, you can export it again so it'll remember your portrait selection.
3.3.2 Using a game editor
You can also use EEKeeper. Open your exported character using the program and click the "Change Portrait" button. You will notice your custom portraits are now listed along the others.
4. HOW TO CHANGE NPC PORTRAITS
As you probably already know, it's not possible to edit a NPC's portrait or soundset using the Customize menu under their record screen.
If you want to do it, however, you don't really need to use a game editor. There's a simple method that will not only apply to any game (new or previously saved), but it's easily reversible.
All you need is to have portraits that use certain specific file names which will be recognized by the game as the original portraits and be shown instead.
These files can be put on your Portraits folder. In fact, be careful not to use these names if you don't want to change a NPC's portrait. Though you will be able to select it for your character, the substitution will still occur.
To revert the process, simply rename or remove the files from your Portraits folder.
Hit the spoiler button to view the list of NPCs and their respective file names:
[spoiler]Ajantis - AJANTISL.bmp, AJANTISM.bmp, AJANTISS.bmp
Alora - ALORAL.bmp, ALORAM.bmp, ALORAS.bmp
Baeloth - BAELOTHL.bmp, BAELOTHM.bmp, BAELOTHS.bmp
Branwen - BRANWENL.bmp, BRANWENM.bmp, BRANWENS.bmp
Coran - CORANL.bmp, CORANM.bmp, CORANS.bmp
Dorn - DORNL.bmp, DORNM.bmp, DORNS.bmp
Dynaheir - DYNAHEIL.bmp, DYNAHEIM.bmp, DYNAHEIS.bmp
Edwin - EDWINL.bmp, EDWINM.bmp, EDWINS.bmp
Eldoth - ELDOTHL.bmp, ELDOTHM.bmp, ELDOTHS.bmp
Faldorn - FALDORNL.bmp, FALDORNM.bmp, FALDORNS.bmp
Garrick - GARRICKL.bmp, GARRICKM.bmp, GARRICKS.bmp
Imoen - IMOENL.bmp, IMOENM.bmp, IMOENS.bmp
Jaheira - JAHEIRAL.bmp, JAHEIRAM.bmp, JAHEIRAS.bmp
Kagain - KAGAINL.bmp, KAGAINM.bmp, KAGAINS.bmp
Khalid - KHALIDL.bmp, KHALIDM.bmp, KHALIDS.bmp
Kivan - KIVANL.bmp, KIVANM.bmp, KIVANS.bmp
Minsc - MINSCL.bmp, MINSCM.bmp, MINSCS.bmp
Montaron - MONTARL.bmp, MONTARM.bmp, MONTARS.bmp
Neera - NEERAL.bmp, NEERAM.bmp, NEERAS.bmp
Quayle - QUAYLEL.bmp, QUAYLEM.bmp, QUAYLES.bmp
Rasaad - RASAADL.bmp, RASAADM.bmp, RASAADS.bmp
Safana - SAFANAL.bmp, SAFANAM.bmp, SAFANAS.bmp
Shar-Teel - SHARTEL.bmp, SHARTEM.bmp, SHARTES.bmp
Skie - SKIEL.bmp, SKIEM.bmp, SKIES.bmp
Tiax - TIAXL.bmp, TIAXM.bmp, SKIES.bmp
Viconia - VICONIAL.bmp, VICONIAM.bmp, VICONIAS.bmp
[/spoiler]
Example: placing IMOENM.bmp and IMOENS.bmp on your portraits folder will make Imoen use these portraits instead of the original.
5. TROUBLESHOOTING
5.1 My custom portraits don't show up at all! (may or may not include: The "CUSTOM" button on the portrait selection isn't even there!)
Are they in the right folder? Double-check the path and if yes, make sure there aren't any typos on the folder name.
Was the game running before you put them there? If you change the contents of the Portraits folder while the game is running, you need to restart it in order for any changes or additions to be applied.
5.2 The file names show up but not the portraits - all I see is a blue silhouette with a question mark!
Make sure the files are 24-bit bitmaps.
If you are using MSPaint, the program will often save .bmp files as 32-bit, even if you specifically select the "24-bit bitmap" file format.
Simply changing the extension of .JPG images will not work. Open up the files in an image editor and save them as bitmaps.
If you're not sure on how to do that, read the next section.
6. A QUICK GUIDE ON EDITING AND SAVING IMAGES
If you're having problems saving or resizing your custom portraits, here are a few tips:
6.1 Resizing and proportions
To learn how to resize an image using MSPaint, check out this link (thanks to @SableRhapsody).
Now, most of the times the image you want to use as a portrait is not on the right proportions, and you most likely don't want it to be all streched or distorted when you save it. So how do we get around that?
You need to edit the image so it'll better "fit" inside the portrait dimensions. Using MSPaint to do that isn't the most practical way (you'll find out why soon enough), but if you really want to try, @Dee posted a quick guide right here.
Truth is, you are better off using a more sophisticated image editor. It doesn't take a graphic designer to do simple resizing and cropping - only patience and a few minutes to learn. I'll give you some tips on how to do it using free software - I figure if you are an Adobe Photoshop user, you don't need help with this.
6.1.1 Using Paint.net
(coming soon)
6.1.2 Using GIMP
[spoiler]GIMP is a free (and pretty powerful) image editor. In fact, it might be overkill for the task at hand (it's a 70MB download and it'll take around 150MB once installed), but it's a nice option if you also want to start fiddling around with other stuff (brightness, contrast, colors, etc). However, that's beyond the scope of this guide, at least for now.
To make a portrait using GIMP, follow these steps (hit the spoiler buttons to see the images):
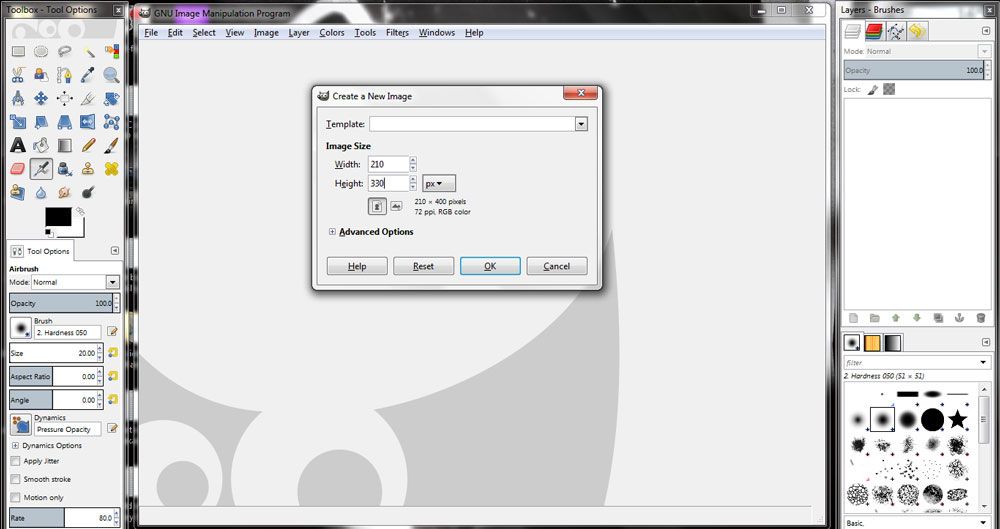
1) Start by clicking File > New. This will open a "Create a New Image" window, where you'll set the file's width to 210 and the height to 330. Keep every other option as it is and hit OK. Now you have a window that looks like this:
[spoiler]![image]() [/spoiler]
[/spoiler]
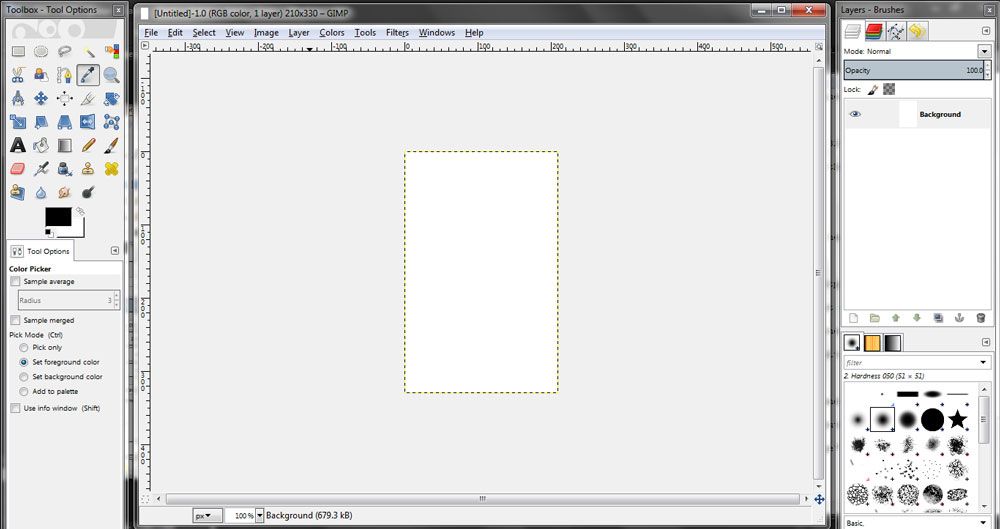
2) Go to the folder where the image you want to edit is. Click the file and drag it into the GIMP window, more specifically, into the image area (trust me, it'll work). Once you do that, you should see only part of the image inside the portrait dimensions. Don't worry, we're making progress.
[spoiler]![image]() [/spoiler]
[/spoiler]
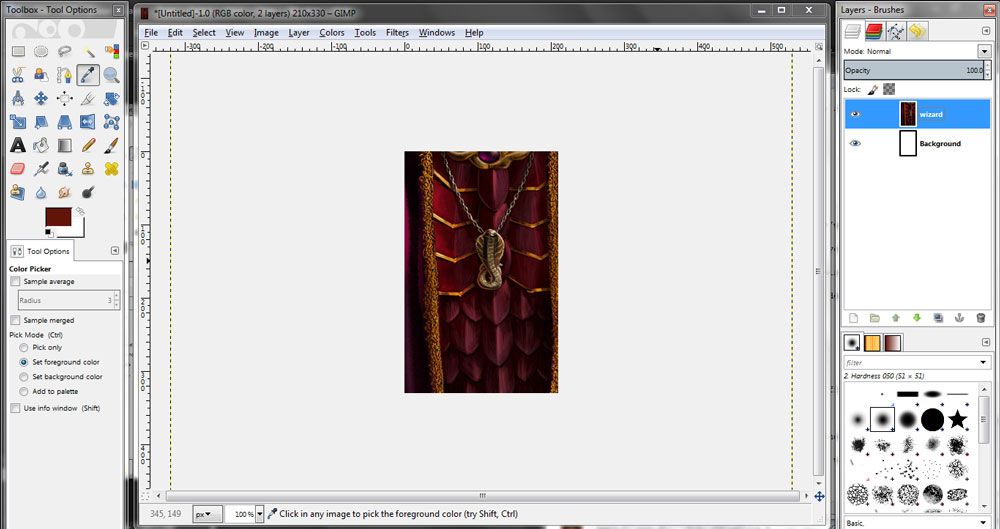
3) Now, take a look at the right part of the screen. There's a small window there named "Layers - Brushes", right? Notice that now that you've dragged your image into GIMP, there's a layer there named after your original image. In my case, here, it's "wizard". Make sure this layer is selected by clicking on it.
[spoiler]![image]() [/spoiler]
[/spoiler]
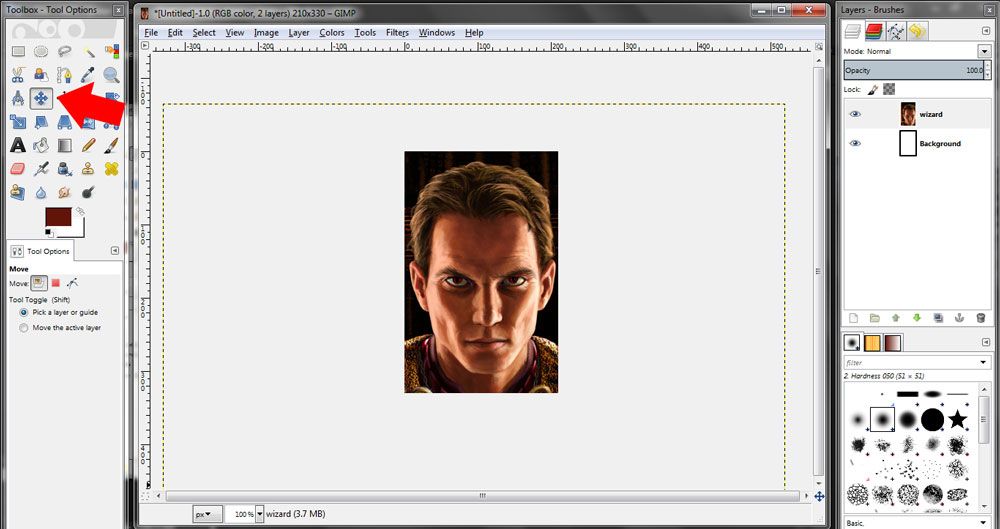
4) Now, take a look at the left part of the screen. There's a rather tall window there named "Toolbox - Tool Options". What we want to click there is the MOVE tool, which is highlighted on the next image. Click that icon.
[spoiler]![image]() [/spoiler]
[/spoiler]
5) Now try clicking and dragging inside your new portrait area. You will notice this area is actually a canvas, or a bounding box. Although not completely visible, the entire image is still there. Move it around until it's "framed" exactly as you want. If you want to zoom out and show more of the image, follow the next step.
6) To resize your layer, select the SCALE tool (highlighted on the next image) by clicking on the icon and then click anywhere on the image. You will notice a small "Scale" window showed up, and the layer is fully visible, with a grid over it. Click on one of the layer's corners and drag it to resize it. If you hold CTRL, the aspect ratio will be kept, avoiding any distortions. Once it's done, you'll need to reposition your layer. Use the MOVE tool again as necessary.
[spoiler]![image]() [/spoiler]
[/spoiler]
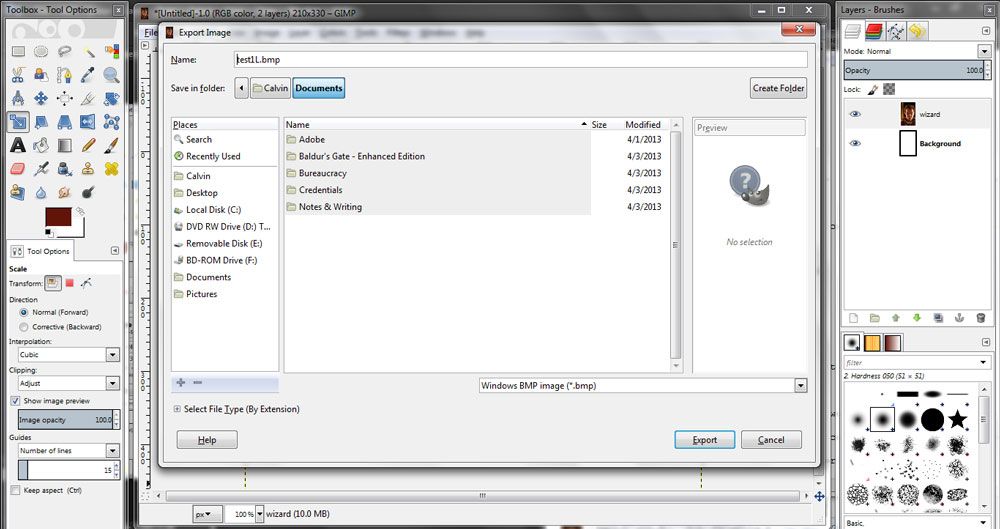
7) Once you're happy with how your portrait looks, it's time to save it. Hit File > Export, and on the Export Image window's lower right corner, hit the dropbox that says "All Export Images" and select "Windows BMP Image (*.bmp)". Select the folder where you want to save it, type in an appropriate name and hit Export.
[spoiler]![image]() [/spoiler]
[/spoiler]
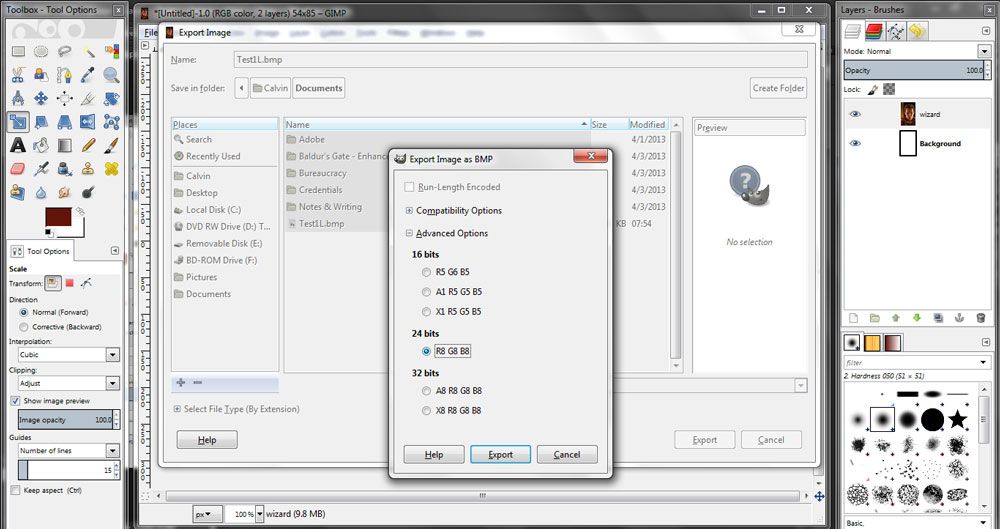
8) Now, before the image is saved, an "Export Image as BMP" window pops up. This is an important step - you need to expand the "Advanced Options" menu and select the "24 bits" option (R8 G8 B8). This will make sure the portrait works. Hit export and you're done...
[spoiler]![image]() [/spoiler]
[/spoiler]
9) ...or almost. We still need the other sizes, right? To resize a whole image in GIMP, go to Image > Scale Image. On the "Scale Image" window, edit the width and height according to the M and S dimensions. Notice that unless you click the little "chain" button, the other axis will automatically adjust to keep the image proportional. Sometimes the measurements will be off by one or two pixels (the medium image will be 169x267, and the small 54x85, for example). This is okay.
10) Once you resized the image, follow step 7 to export it again to another BMP file.[/spoiler]
Many many thanks to everyone who contributed to this thread with further advice and/or questions.
1. PORTRAIT FILES
1.1 Image file format
Portraits for BG:EE are 24-bit bitmaps (.BMP). You can save images in this format using practically any image editor such as MSPaint, Adobe Photoshop or GIMP. (Check Item 6 for more info on how to properly convert your image)
1.2 Image file dimensions
UPDATE: you can now use a single large portrait, which will be resized to fit the other screens. The optimal size is 210x330 pixels. Keep it at a minimum of 169x266, to prevent blurred images.
Images can be larger than that, but no wider than 1024 pixels. Also try to keep it proportional to the dimensions that have just been mentioned, otherwise, the image will be "squeezed" and may look distorted. (Check Item 6 for more info on how to properly crop your image)
The deprecated directions are still valid and are useful if you'd like your character to have different images for each screen (or, in IWD style, different crops):
[spoiler]To use a custom portrait, you need 3 versions of an image (only 2 are required, though) with different dimensions (width x height, in pixels):
Large - 210x300 (not required - character creation screen)
Medium - 169x266 (for the character record screen)
Small - 54x84 (for the right sidebar of the game screen)[/spoiler]
1.3 Image file naming conventions
You can name your portraits however you want, as long as you follow these rules:
· NO spaces.
· Between 1 and 7 characters (not counting the size letter, see below)
· End with the letter L, M or S, according to size.
e.g.: mulderL.bmp (large), scullyM.bmp (medium), krycekS.bmp (small).
2. THE "PORTRAITS" FOLDER
In order for your portraits to show up in BG:EE, you must place them in an specific folder, named "Portraits" (without quotes). This folder is not created when the game is installed, so you must create it yourself.
2.1 Where to create your "Portraits" folder
On Windows: go to your User(s) folder. You know, the one that has My Music, My Pictures, and so on. Now follow this path: My Documents > Baldur's Gate - Enhanced Edition. That's where you must create your Portraits folder.
3. USING CUSTOM PORTRAITS
Once you have the right files on the right folder, all you have to do is select the portrait inside the game.
3.1 On a new character
When creating a new character, once you're prompted to select his or her portrait, you will notice a button labeled "CUSTOM" now shows up on the screen.
This button will take you to the screen shown below, where you'll be able to select the Medium and Small portraits. They're not required to match - you can use different M and S portraits for one character if you so desire.
(hit the spoiler button to see image)
[spoiler]
 [/spoiler]
The Large portrait will be selected automatically according to the Medium one, or ignored (if there is no L version).
3.2 On a previously created character
If you're already playing a character and want to change it's portrait, go to his/her Record screen and hit the button labeled "CUSTOMIZE", then "APPEARANCE".
Once you're prompted to select his or her portrait, you will notice a button labeled "CUSTOM" now shows up on the screen.
This button will take you to the screen shown below, where you'll be able to select the Medium and Small portraits. They're not required to match - you can use different M and S portraits for one character if you so desire.
The Large portrait will be selected automatically according to the Medium one, or ignored (if there is no L version).
3.3 On an exported character
Changing the portrait of an exported character is just a little trickier. There are two ways you can do so:
3.3.1 Via importing/re-exporting
Import your character into a new game (or into a loaded multiplayer game), and then follow the steps on 3.2. After doing so, you can export it again so it'll remember your portrait selection.
3.3.2 Using a game editor
You can also use EEKeeper. Open your exported character using the program and click the "Change Portrait" button. You will notice your custom portraits are now listed along the others.
4. HOW TO CHANGE NPC PORTRAITS
As you probably already know, it's not possible to edit a NPC's portrait or soundset using the Customize menu under their record screen.
If you want to do it, however, you don't really need to use a game editor. There's a simple method that will not only apply to any game (new or previously saved), but it's easily reversible.
All you need is to have portraits that use certain specific file names which will be recognized by the game as the original portraits and be shown instead.
These files can be put on your Portraits folder. In fact, be careful not to use these names if you don't want to change a NPC's portrait. Though you will be able to select it for your character, the substitution will still occur.
To revert the process, simply rename or remove the files from your Portraits folder.
Hit the spoiler button to view the list of NPCs and their respective file names:
[spoiler]Ajantis - AJANTISL.bmp, AJANTISM.bmp, AJANTISS.bmp
Alora - ALORAL.bmp, ALORAM.bmp, ALORAS.bmp
Baeloth - BAELOTHL.bmp, BAELOTHM.bmp, BAELOTHS.bmp
Branwen - BRANWENL.bmp, BRANWENM.bmp, BRANWENS.bmp
Coran - CORANL.bmp, CORANM.bmp, CORANS.bmp
Dorn - DORNL.bmp, DORNM.bmp, DORNS.bmp
Dynaheir - DYNAHEIL.bmp, DYNAHEIM.bmp, DYNAHEIS.bmp
Edwin - EDWINL.bmp, EDWINM.bmp, EDWINS.bmp
Eldoth - ELDOTHL.bmp, ELDOTHM.bmp, ELDOTHS.bmp
Faldorn - FALDORNL.bmp, FALDORNM.bmp, FALDORNS.bmp
Garrick - GARRICKL.bmp, GARRICKM.bmp, GARRICKS.bmp
Imoen - IMOENL.bmp, IMOENM.bmp, IMOENS.bmp
Jaheira - JAHEIRAL.bmp, JAHEIRAM.bmp, JAHEIRAS.bmp
Kagain - KAGAINL.bmp, KAGAINM.bmp, KAGAINS.bmp
Khalid - KHALIDL.bmp, KHALIDM.bmp, KHALIDS.bmp
Kivan - KIVANL.bmp, KIVANM.bmp, KIVANS.bmp
Minsc - MINSCL.bmp, MINSCM.bmp, MINSCS.bmp
Montaron - MONTARL.bmp, MONTARM.bmp, MONTARS.bmp
Neera - NEERAL.bmp, NEERAM.bmp, NEERAS.bmp
Quayle - QUAYLEL.bmp, QUAYLEM.bmp, QUAYLES.bmp
Rasaad - RASAADL.bmp, RASAADM.bmp, RASAADS.bmp
Safana - SAFANAL.bmp, SAFANAM.bmp, SAFANAS.bmp
Shar-Teel - SHARTEL.bmp, SHARTEM.bmp, SHARTES.bmp
Skie - SKIEL.bmp, SKIEM.bmp, SKIES.bmp
Tiax - TIAXL.bmp, TIAXM.bmp, SKIES.bmp
Viconia - VICONIAL.bmp, VICONIAM.bmp, VICONIAS.bmp
[/spoiler]
Example: placing IMOENM.bmp and IMOENS.bmp on your portraits folder will make Imoen use these portraits instead of the original.
5. TROUBLESHOOTING
5.1 My custom portraits don't show up at all! (may or may not include: The "CUSTOM" button on the portrait selection isn't even there!)
Are they in the right folder? Double-check the path and if yes, make sure there aren't any typos on the folder name.
Was the game running before you put them there? If you change the contents of the Portraits folder while the game is running, you need to restart it in order for any changes or additions to be applied.
5.2 The file names show up but not the portraits - all I see is a blue silhouette with a question mark!
Make sure the files are 24-bit bitmaps.
If you are using MSPaint, the program will often save .bmp files as 32-bit, even if you specifically select the "24-bit bitmap" file format.
Simply changing the extension of .JPG images will not work. Open up the files in an image editor and save them as bitmaps.
If you're not sure on how to do that, read the next section.
6. A QUICK GUIDE ON EDITING AND SAVING IMAGES
If you're having problems saving or resizing your custom portraits, here are a few tips:
6.1 Resizing and proportions
To learn how to resize an image using MSPaint, check out this link (thanks to @SableRhapsody).
Now, most of the times the image you want to use as a portrait is not on the right proportions, and you most likely don't want it to be all streched or distorted when you save it. So how do we get around that?
You need to edit the image so it'll better "fit" inside the portrait dimensions. Using MSPaint to do that isn't the most practical way (you'll find out why soon enough), but if you really want to try, @Dee posted a quick guide right here.
Truth is, you are better off using a more sophisticated image editor. It doesn't take a graphic designer to do simple resizing and cropping - only patience and a few minutes to learn. I'll give you some tips on how to do it using free software - I figure if you are an Adobe Photoshop user, you don't need help with this.
6.1.1 Using Paint.net
(coming soon)
6.1.2 Using GIMP
[spoiler]GIMP is a free (and pretty powerful) image editor. In fact, it might be overkill for the task at hand (it's a 70MB download and it'll take around 150MB once installed), but it's a nice option if you also want to start fiddling around with other stuff (brightness, contrast, colors, etc). However, that's beyond the scope of this guide, at least for now.
To make a portrait using GIMP, follow these steps (hit the spoiler buttons to see the images):
1) Start by clicking File > New. This will open a "Create a New Image" window, where you'll set the file's width to 210 and the height to 330. Keep every other option as it is and hit OK. Now you have a window that looks like this:
[spoiler]
 [/spoiler]
2) Go to the folder where the image you want to edit is. Click the file and drag it into the GIMP window, more specifically, into the image area (trust me, it'll work). Once you do that, you should see only part of the image inside the portrait dimensions. Don't worry, we're making progress.
[spoiler]
 [/spoiler]
3) Now, take a look at the right part of the screen. There's a small window there named "Layers - Brushes", right? Notice that now that you've dragged your image into GIMP, there's a layer there named after your original image. In my case, here, it's "wizard". Make sure this layer is selected by clicking on it.
[spoiler]
 [/spoiler]
4) Now, take a look at the left part of the screen. There's a rather tall window there named "Toolbox - Tool Options". What we want to click there is the MOVE tool, which is highlighted on the next image. Click that icon.
[spoiler]
 [/spoiler]
5) Now try clicking and dragging inside your new portrait area. You will notice this area is actually a canvas, or a bounding box. Although not completely visible, the entire image is still there. Move it around until it's "framed" exactly as you want. If you want to zoom out and show more of the image, follow the next step.
6) To resize your layer, select the SCALE tool (highlighted on the next image) by clicking on the icon and then click anywhere on the image. You will notice a small "Scale" window showed up, and the layer is fully visible, with a grid over it. Click on one of the layer's corners and drag it to resize it. If you hold CTRL, the aspect ratio will be kept, avoiding any distortions. Once it's done, you'll need to reposition your layer. Use the MOVE tool again as necessary.
[spoiler]
 [/spoiler]
7) Once you're happy with how your portrait looks, it's time to save it. Hit File > Export, and on the Export Image window's lower right corner, hit the dropbox that says "All Export Images" and select "Windows BMP Image (*.bmp)". Select the folder where you want to save it, type in an appropriate name and hit Export.
[spoiler]
 [/spoiler]
8) Now, before the image is saved, an "Export Image as BMP" window pops up. This is an important step - you need to expand the "Advanced Options" menu and select the "24 bits" option (R8 G8 B8). This will make sure the portrait works. Hit export and you're done...
[spoiler]
 [/spoiler]
9) ...or almost. We still need the other sizes, right? To resize a whole image in GIMP, go to Image > Scale Image. On the "Scale Image" window, edit the width and height according to the M and S dimensions. Notice that unless you click the little "chain" button, the other axis will automatically adjust to keep the image proportional. Sometimes the measurements will be off by one or two pixels (the medium image will be 169x267, and the small 54x85, for example). This is okay.
10) Once you resized the image, follow step 7 to export it again to another BMP file.[/spoiler]
↧